My Story: Why Bigjpg Became My Go-To Tool
Ever since jumping headfirst into the world of digital photography and illustration, I’ve chased that elusive “perfect” image: sharp, crisp, and worthy of printing for my own wall or sharing with my YouTube followers. But if you’ve ever dug through old hard drives and family albums, you know the heartbreak—those treasured photos from the 1990s are usually tiny, pixelated, and fading fast.
There’s something nostalgic about holding an old print, feeling the roughness of the paper’s edge and the faint sticky residue from a decade-old album. I remember finding a photo of my parents at Crater Lake—a cherished shot, but hopelessly blurry and only 500 pixels wide. Regular upscalers left me with stiff, plasticky results or odd skin tones. Enter Bigjpg—a tool I’d read about in forums, promising AI-based upscaling without wrecking original art style. I was skeptical at first. Another “AI magic” app? But that first try changed everything: the anime poster I uploaded came out vivid and sharp, and—best of all—the family photo was good enough to print at poster size for my home office.
Honestly, what sold me on Bigjpg wasn’t just its algorithm or the free plan; it was the way it made technical things feel simple. The upload was drag-and-drop, there was an immediate preview, and unlike some competitors, I wasn’t bombarded with confusing checkboxes or jargon. Is it strange to admit I sometimes prefer a tool that doesn’t make me feel like I need a Ph.D. in computer science to get great results?
And if you’ve ever processed a bunch of images at once and then couldn’t remember where you saved the upscaled files…well, you’re not alone. Happens to me every single time. (Relatable moment, right?)
What is Bigjpg? How Does AI Upscaling Work?
Key Tech Principles
If you’re new to image upscaling—or just wonder what makes “AI upscalers” different from old-school resizing—let’s break it down. Bigjpg is an online tool (with apps for Windows, Mac, and mobile) that uses a form of deep learning called a convolutional neural network (CNN) to intelligently enlarge images. Instead of merely stretching pixels, it analyzes patterns, edges, and colors to rebuild details intelligently.
bigjpg ai uses deep convolutional neural networks to upscale images, preserving clean lines and smooth gradients, especially for anime art and photos.
Think of it like this: While old resizing algorithms just multiply each pixel, AI-based upscalers study thousands (sometimes millions) of images to learn what “good sharpness” or “natural skin tone” looks like. When you drop in your pixelated anime drawing or faded portrait, Bigjpg doesn’t just guess—it tries to reconstruct fine lines, gradients, and texture based on what it knows.
Artwork vs Photo Algorithms
One thing that sets Bigjpg apart is its dual-algorithm approach: you explicitly pick “Artwork” or “Photo” mode. Behind the scenes, Artwork mode focuses on keeping black lines crisp, filling in color regions smoothly, and avoiding that waxy or watercolor look generic tools produce. For photos, the AI attends to complex lighting, gradients, and skin details—trying to avoid plastic-looking faces or smudge effects.
In my experience, the difference is obvious. Anime art comes out remarkably sharp, with vibrant color fields that feel true to the original. On photos, it usually preserves fine grain without introducing weird pastel artifacts. That’s not to say it’s perfect—sometimes background textures still look a little soft, but for 90% of upscaling needs (especially for web or print), it’s more than enough.
If you’ve ever wondered, “Why not just let Photoshop do it?”—Bigjpg’s secret sauce is that dataset and smart mode switch, not to mention how it runs everything in the cloud so your computer doesn’t need a monster GPU.
Bigjpg vs Topaz Gigapixel & Picwand AI: Real-World Results
Table: Feature & Price
Let’s get straight to what everyone wonders: how does Bigjpg stack up against the much-hyped Topaz Gigapixel and the newer Picwand AI? I’ve spent long weekends batch-processing travel selfies, anime desktop wallpapers, and old scanned photos through all three platforms to give you an honest comparison.
bigjpg vs topaz gigapixel: Bigjpg excels at anime upscaling with easy controls and strong privacy, while Topaz Gigapixel leads in raw control and fidelity—at a steeper price and learning curve.
Here’s a quick overview table based on my testing and public pricing:
|
Feature |
|||
|
Platform Support |
Web, Win, Mac, Mobile |
Win, Mac |
Web |
|
Free Plan |
Yes |
No (trial only) |
Yes |
|
Max Scale (Free/Paid) |
2x (free), 4x+ |
6x+ |
4x |
|
Anime Optimization |
Yes (special mode) |
No (general only) |
Partial |
|
Batch Processing |
Yes (paid) |
Yes |
Limited |
|
Price (Yearly) |
$0/$6.99-$19.99 |
~$99 (one-time) |
$7/mo or free |
|
Privacy: Image Deletion |
Automatic delete |
Local/Cloud, user-controlled |
Unclear |
|
Advanced Tuning |
Denoise, scale |
Extensive sliders |
Moderate |
|
Export format |
PNG/JPG |
PNG/TIFF/JPG |
JPG/PNG |
Side-by-Side Samples
Let’s talk actual results, because specs only tell half the story. On a classic test—upscaling a 600x800px anime illustration—Bigjpg’s output held crisp black lines and color gradients, something Topaz sometimes softened, especially without heavy manual tweaking. For an old 640x480 group photo, Topaz did reveal slightly more fine face detail but sometimes produced odd smoothness that felt a little uncanny valley. Picwand AI? Quick and free for small jobs, but results occasionally looked oversharpened, especially on skin tones.
And yup, time to render a pull quote:
“For anime and line art, Bigjpg gives you a ready-to-share result with basically one click. Topaz is king for photography pros who’ll tweak every slider—but you’ll pay in both money and learning curve.” – Emily, Tech for Togetherness
Pros, Cons & Best Use Cases
-
Bigjpg
- Pros: Easy workflow; clear anime/photo switch; privacy-focused; great free plan.
- Cons: Max scale limited on free, longer processing speed at peak times, fewer advanced controls.
- Best for: Anime illustrators, hobbyists, social media creators, anyone valuing quick & simple results.
-
Topaz Gigapixel
- Pros: Best-in-class detail for complex photos; batch and local processing; tons of manual control.
- Cons: Expensive; steep learning curve; less effective for anime art.
- Best for: Photographers, designers who need print-quality upscaling and love customization.
-
Picwand AI
- Pros: No-login quick jobs, straightforward UI, decent for new users.
- Cons: Occasional artifacting, less robust on both anime and detailed photography, privacy unclear.
- Best for: Casual one-offs, users avoiding installation, quick online fixes.
For most creative and everyday needs—especially anime and community art—Bigjpg is tough to beat for sheer ease and peace of mind. Power users and those printing gallery shots? You’ll benefit from Topaz’s controls (if you have the time to learn).
And—have you ever discovered three upscaled versions of the same picture in your downloads folder, then spent ten minutes figuring out which tool made which? Welcome to my world! (Real-life comparison chaos.)
Step-by-Step: How to Use Bigjpg for Best Results
Quick Start Guide
Ready to upscale your image with Bigjpg? Here’s how I streamlined my own workflow—from blurry to brilliant—in just a few clicks. You don’t need to be some AI expert (trust me!), and you can use either the web app or the desktop/mobile version.
Step-by-step:
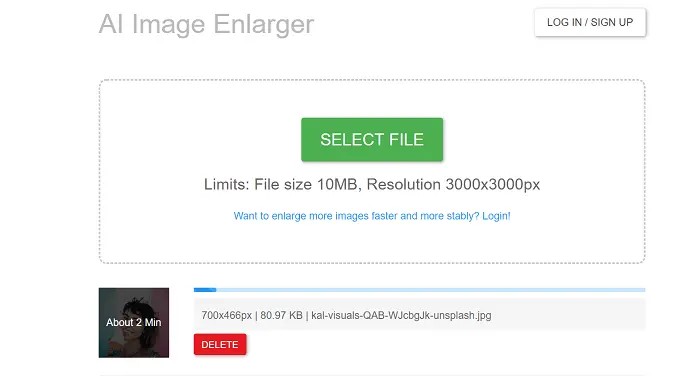
- Go to Bigjpg.com or open the app on your device.
- Upload your image. You’ll see a drag-and-drop box—just toss in the file from your computer or phone.
- Choose your mode: Is this a drawing or a real-life picture? Select “Artwork” or “Photo.”
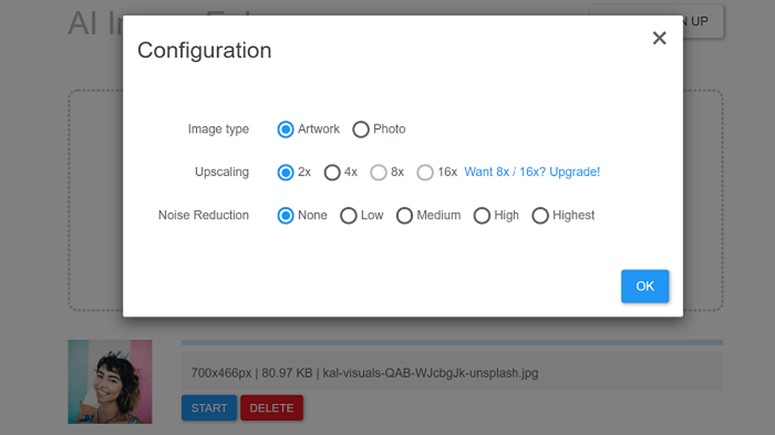
- Pick your scale: Usually 2x or 4x. Free users get up to 2x; paid can go even higher.
- Select noise reduction level: Options are None, Low, Medium, High, and Highest. (More on what this means in the next section.)
- Click “OK” and wait a little. (Paid = faster, but even free rarely takes more than a few minutes.)
- Download your results! Voila—check your Downloads, or the “Saved Images” tab.
Checklist for first-timers:
- Use Artwork mode for digital art, comics, or linework.
- Try Medium noise reduction for old/dusty scans, Low for clean files.
- Remember: web version queues large, free jobs—plan ahead if you’re rushing!
Advanced Denoising & Scaling
Want more control? Getting the best results often means fussing with noise reduction and scale. Here’s how I break it down:
-
Noise Reduction:
- None/Low: Keeps lots of grain and details; can reveal flaws if the source is noisy.
- Medium: My default for old photos and most anime wallpapers. Balances sharpness and artifact cleaning.
- High/Highest: Good for scans with tons of blur/dust, but may strip fine pencil lines or subtle textures. Sometimes faces look waxy.
-
Scaling Up:
- 2x: Perfect for social, blogs, and screens.
- 4x: When you want something big—wall art, posters, photo books, sharp prints.
- Don’t stack max scale and highest denoise unless your file is very clean—or you’re okay with a soft, almost painted look.
When I made the mistake of choosing “Highest” noise reduction on a comic panel, the color blocks looked smooth, but all my artist friend’s pencil notes and sketch lines were gone. Oops… (See? Even “expert” reviewers mess up!)
What Not to Do: Common Mistakes
- Don’t try to upscale highly compressed JPEGs from social media—you’ll often just enlarge the blur and web artifacts.
- Avoid cranking “Highest” noise unless your original is really noisy.
- Always preview—Bigjpg gives you a free crop result demo. Use it!
Who Should Use Which Settings?
- Creatives or artists: Start with photo mode for detailed, textured illustrations or cross-hatched pieces.
- Small business/social users: Default to 2x, Medium denoise—it’s the sweet spot for clarity and speed.
Upscaling magic happens when you match the settings to your image: “Medium” and “2x” solve 80% of my projects, but don’t be afraid to experiment.
And that moment when the progress bar finishes and you see your faded photo pop—where you can spot new facial details or read text you’d forgotten—honestly, it never gets old.
FAQs: Troubleshooting, Privacy, Batch Processing
Troubleshooting
Even with AI magic, things don’t always go according to plan. Here are the most common hurdles I’ve seen (and stumbled over myself):
- My image looks too soft or lost detail:
Try reducing the noise reduction level. Sometimes “Medium” or “High” can wash out fine pencil strokes or facial features. Re-run with “Low” or even “None” if your image is already clean. - Processing is slow or times out:
Free users sometimes queue behind paid jobs, especially at peak times. If possible, process images during off-hours or consider a short-term paid upgrade for batch work. - Strange artifacts or colors after upscaling:
This may happen if you choose the wrong mode (Photo vs. Anime) or crank up scale + denoise together. Always preview the free crop result before downloading the final file.
Privacy & Image Deletion
Bigjpg stands out for its privacy-first approach. According to its policy (Bigjpg 2025), images are automatically deleted from their servers shortly after processing—so no lingering worries about where your personal photos might end up. This is a major comfort, especially compared to some competitors that may store jobs for batch review or "feature improvement" analysis.
- Tip: If you're working with sensitive, professional, or family images, this quick auto-deletion is a reassuring feature.
Batch Processing Tips
If you upgrade to a paid plan, you unlock true batch processing—that means you can toss in multiple files (as folders or drag-and-drop) and let Bigjpg handle the queue. Workflow tips:
- Keep each batch organized in its own output folder—trust me, it’s easy to lose track!
- Don’t mix drastically different image types (like sketches + photos) in the same batch to avoid odd results.
- Paid users get higher speed and priority, making bulk edits viable for creative pros or businesses.
Checklist:
- Preview before running bulk jobs.
- Label batches by project/date.
- Back up your originals—just in case.
Most Bigjpg problems have a quick fix—and between auto-deletion and sensible batching, it’s basically drama-free AI upscaling.
You know you’re getting old (like me) when you laugh at the fact that “saving files in the right folder” is still the trickiest part of any modern workflow!
Conclusion & My Favorite Workflows with Bigjpg
As someone who’s obsessed over getting every photo and illustration “just right,” I can honestly say Bigjpg has earned a permanent spot in my digital toolbox. Whether I’m reviving a treasured family snapshot or prepping high-res anime art for a YouTube tutorial, it’s the speed and simplicity that keep me coming back.
- Bigjpg shines brightest with anime and digital art—preserving crisp lines and vivid colors, often outdoing pricier tools when it comes to ease of use.
- For everyday photos, its smart default settings deliver results that are ready to share or even print—no deep technical tweaks required.
- Privacy-minded? The auto-deletion feature means your personal creations never linger online longer than they should.
- Batch processing on a paid plan transforms laborious upscaling into a one-click solution—perfect for creative pros or side hustlers.
These days, my favorite workflow is to organize projects by image type (anime, portraits, old scans), run a quick preview using Bigjpg’s crop tool, pick “Medium” noise reduction for most jobs, and keep outputs neatly sorted (when I remember…). And hey, if you want that one-click magic with zero hassle, you’ve got to give Bigjpg’s free plan a try—it’s an ideal gateway before diving into more advanced tools.
If you’re ready to unlock new detail in your favorite art or breathe life into vintage memories, Bigjpg is definitely worth a shot.
Try Bigjpg for Free – Instantly Upscale Your Images